- Empty document
- Abstract and keywords
- Bibliography
- Table of contents and other lists
- Sections
- Figures
- Tables
- Source code
- Appendices
- Acronyms
This short tutorial demonstrates via examples the required changes to the document files to produce sections and features typically used in thesis documents. Some of the features are standard LaTeX, others make use of special macros introduced in the thesis class file.
Empty document
First, we begin with an empty document (e.g. thesis.tex)
by filling in the basic document metadata:
\documentclass[language=finnish,mainfont=none]{utuftthesis}

\pubyear{2019}
\pubmonth{6}
\publab{Labran nimi}
\publaben{Laboratory Name}
\pubtype{gradu}

\title{Name of Thesis}
\author{My Name}

\begin{document}

\maketitle

\end{document}
The UTU template uses few non-standard macros. You wont't find documentation for these elsewhere. The semantics of the macros is described on the page 'Configuring the template'.
❗ Non-standard utuftthesis.cls macros: documentclass, pubyear, pubmonth,
publab, publaben, pubtype. ❗
Abstract and keywords
Documents with abstracts in two languages
(the "native" language is defined in utuftthesis.cls, the document's
language is the default language):
...
\begin{document}

\maketitle

\keywords{asia, sanoja}
\keywordsen{here, a, list, of, keywords}

\begin{abstract}
Lorem ipsum dolor sit amet, consectetur adipiscing elit, sed
do eiusmod tempor incididunt ut labore et dolore magna aliqua.
Ut enim ad minim veniam, quis nostrud exercitation ullamco laboris
nisi ut aliquip ex ea commodo consequat. Duis aute irure dolor in
reprehenderit in voluptate velit esse cillum dolore eu fugiat nulla
pariatur. Excepteur sint occaecat cupidatat non proident, sunt in
culpa qui officia deserunt mollit anim id est laborum.
\end{abstract}

\begin{abstracten}
Second abstract in english (in case the document main language is
not english)
\end{abstracten}
...
You can switch the rendering order by switching the order of the environments.
Or just use plain english:
\documentclass[language=english,mainfont=none]{utuftthesis}
...
\begin{document}

\maketitle

\keywords{here, a, list, of, keywords}

\begin{abstract}
Second abstract in english (in case the document main language is
not english)
\end{abstract}
...
❗ Non-standard utuftthesis.cls macros: keywordsen, abstracten. ❗
Bibliography
The 'thesis' template defaults to using the
biblatex
package and the Biber engine to
generate bibliographies and citations.
Note that the biblatex package is not necessarily compatible with
the packages bibtex and natbib! The use of biblatex is highly recommended as
styling can more easily be defined in ordinary LaTeX with Unicode support.
Bibtex uses a special legacy syntax for the style definitions.
See the advanced section for configuring bibliography styles.
The use of bibliography requires two steps. First, the bibliography
file needs to be included with \addbibresource.
\addbibresource{mybibs.bib}

...
\begin{document}
...
The contents of the file mybibs.bib may look like this:
@article{crawley2007write,
  title={How to Write a Research Proposal and Succeed},
  author={Crawley, Gerard M and O'Sullivan, Eoin},
  year={2007},
  publisher={World Scientific}
}
The entry type name must begin with an '@' character. A comprehensive list of entry types with descriptions can be found in the section 2.2 of the Biblatex manual. Typical entry types are 'book', 'article', 'inproceedings' etc.
The matrix on the wikibook page shows which fields are relevant and rendered on the final document for each entry type. The required/optional fields are also listed in the section 2.2 of the Biblatex manual.
Some bibliography entries contain web URLs and the URL might contain
the underscore (_) character. You'll need to replace those with
the following escaped version
to avoid compilation issues: {\_}
When citing, use the bibliography ID (here: 'crawley2007write') specified in the bib file. See the biblatex manual for more advanced instructions.
\begin{document}
...

According to \textcite{crawley2007write} this is a rather
interesting observation. Further work is required to fully
analyze the consequences.

On the other hand, this citation appears at the end of
this paragraph \cite{crawley2007write}.
...

The following resources may also help with the biblatex configuration:
Table of contents and other lists
All the \listofX commands are optional. The usage is pretty
straightforward. The recommended order for the listings is right
after the table of contents.
Note: the rendering of the list of acronyms might fail if the LaTeX build scripts are not working properly. You'll need to check that the glossaries are properly generated.
\begin{document}
...
\tableofcontents
\listoffigures
\listoftables
\listofacronyms
...
❗ Non-standard utuftthesis.cls macros: listofacronyms. ❗
Sections
There are four levels of chapters / sections available. The usage is
pretty straightforward. You can refer to a certain chapter / section
by using the \ref{sec:mysection} macro. Note that the sec: prefixes
listed here are only suggested conventions which make it easier to
verify the type of the target. You can also refer to the page number
with the \pageref macro.
\begin{document}
...
\chapter{Introduction} \label{chap:intro}

\section{Section} \label{sec:mysection}
\subsection{Subsection} \label{subsec:mysubsection}
\subsubsection{SubSubsection} \label{subsubsec:mysubsubsection}
Figures
Note the order of \caption and \label macros inside the figure environment!
\begin{document}
...
\begin{figure}
\centering \includegraphics[width=0.5\textwidth]{figs/utulogoen}
\caption{University of Turku logo}
\label{fig:utu-logo}
\end{figure}

Tables
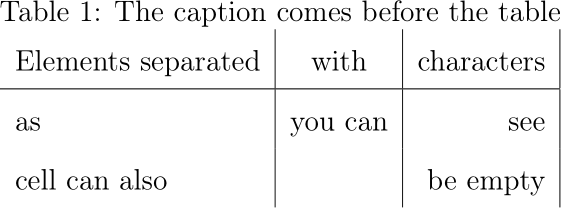
In LaTeX, there are multiple table environments to choose from. Studying the LaTeX/Tables wikibook is highly recommended.
If you have lots of data that needs to be converted to a table, instead of typing the data manually, using Unix sed/awk, R/Knitr, Pandoc or copy & paste from Excel to LyX might be preferable options.
\begin{document}
...
\begin{table}
\centering{}\caption{The caption comes before the table\label{tab:my-table1}}
\begin{tabular}{l|c|r|}
Elements separated & with & characters \tabularnewline
\hline
as  & you can & see \tabularnewline
cell can also  &  & be empty \tabularnewline
\end{tabular}
\end{table}

Source code
The 'thesis' template supports two approaches to embedding source code: 'minted' and listings.
'Listings' is the old standard way of including source code. It is a bit easier to set up and has wider support in LaTeX installations out of the box. It might also be easier to use if you need to add support for a new custom language (e.g. something you developed as part of the thesis work). Quite often the syntax definitions are outdated so you need to customize the syntax definitions anyway.
Unfortunately 'listings' does not support 8-bit extended ASCII or Unicode (there's an updated 'listingsutf8' which, despite the name, does not support full Unicode). 'Listings' is not recommended for modern programming languages and does not even support finnish äåö characters properly. If you are perfectly happy with 7-bit ASCII, using 'listings' should be fine. If you need extended characters, it might also work if you only need those at the end of the lines.
When using 'minted', one should build the thesis with the latexmk
script (see the test code for examples). Setting minted=false
in the document class will set up a fake 'minted' environment
to actually render the code with 'listings'.
| Feature | listings | listingsutf8 | minted |
|---|---|---|---|
| Easy to set up | yes | yes | no |
| Requires external tools | no | no | yes |
| Requires extra build switches | no | no | yes |
| Unicode support | no | partial | yes |
| High configurability | no | no | yes |
| Up to date syntax definitions | no | no | quite |
| Easy to extend syntax | yes | yes | no |
\documentclass[language=finnish,mainfont=none,minted=true]{utuftthesis}
...

\begin{document}
...
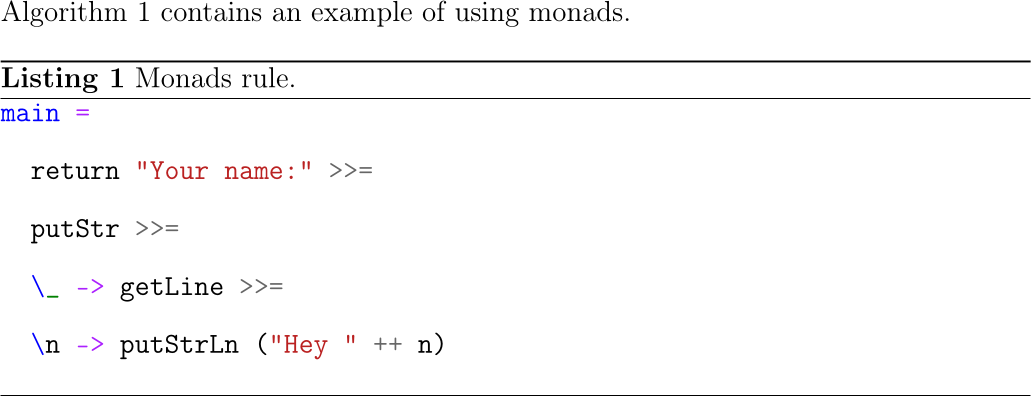
Algorithm \ref{alg:example} contains an example of using monads.

\begin{algorithm}[tbh]
\begin{minted}{haskell}
main =
  return "Your name:" >>=
  putStr >>=
  \_ -> getLine >>=
  \n -> putStrLn ("Hey " ++ n)
\end{minted}
\caption{Monads rule.\label{alg:example}}
\end{algorithm}

Appendices
Simply use \appchapter instead of \chapter to guide the
page count logic. \printbibliography must appear before
all appendices.
\begin{document}
...
\printbibliography
\appchapter{Appendix 1}

Lorem ipsum dolor sit amet, consectetur adipiscing elit.
...
\end{document}
❗ Non-standard utuftthesis.cls macros: appchapter. ❗
Acronyms
This Example generates few pages of acronyms.
\documentclass[language=finnish,version=final,mainfont=none,sharelatex=false]{utuftthesis}
\setcounter{secnumdepth}{2}
\setcounter{tocdepth}{2}

\begin{document}

\publab{Labran nimi}
\pubtype{tkk}
\title{Name of Thesis}
\author{My Name}

\maketitle
\input{abstract.tex}

\tableofcontents

% Note: rendered here
\listofacronyms

\chapter{Johdanto} \label{Johdanto}

% Note: declared here
Tyyppiluokan voi nähdä eräänlaisena abstraktina ohjelmointirajapintana
(API\nomenclature[API]{API}{Application Programming Interface}),
joka muodostaa ohjelmoijalle abstraktin ohjelmointikielen käyttöliittymän
(UI\nomenclature[UI]{UI}{User Interface}).

\newpage

More stuff:

% Note: declared here
(UI1\nomenclature[UI1]{UI1}{User Interface}).
(UI2\nomenclature[UI2]{UI2}{User Interface}).
(UI3\nomenclature[UI3]{UI3}{User Interface}).
(UI4\nomenclature[UI4]{UI4}{User Interface}).
(UI5\nomenclature[UI5]{UI5}{User Interface}).
(UI6\nomenclature[UI6]{UI6}{User Interface}).
(UI7\nomenclature[UI7]{UI7}{User Interface}).
(UI8\nomenclature[UI8]{UI8}{User Interface}).
(UI9\nomenclature[UI9]{UI9}{User Interface}).
(UI11\nomenclature[UI11]{UI11}{User Interface}).
(UI12\nomenclature[UI12]{UI12}{User Interface}).
(UI13\nomenclature[UI13]{UI13}{User Interface}).
(UI14\nomenclature[UI14]{UI14}{User Interface}).
(UI15\nomenclature[UI15]{UI15}{User Interface}).
(UI16\nomenclature[UI16]{UI16}{User Interface}).
(UI17\nomenclature[UI17]{UI17}{User Interface}).
(UI18\nomenclature[UI18]{UI18}{User Interface}).
(UI19\nomenclature[UI19]{UI19}{User Interface}).
\printbibliography

\end{document}